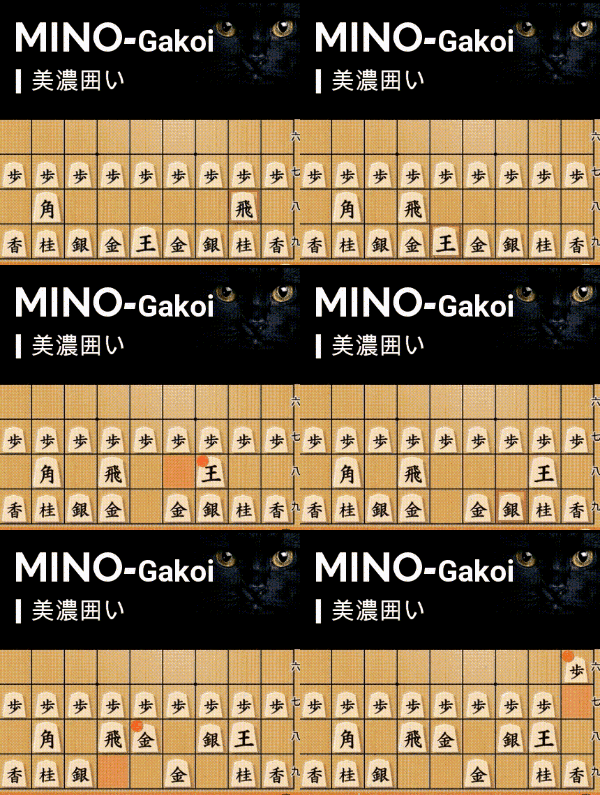
Techniques for Breaking the Mino Castle (1) Attacking from the Side
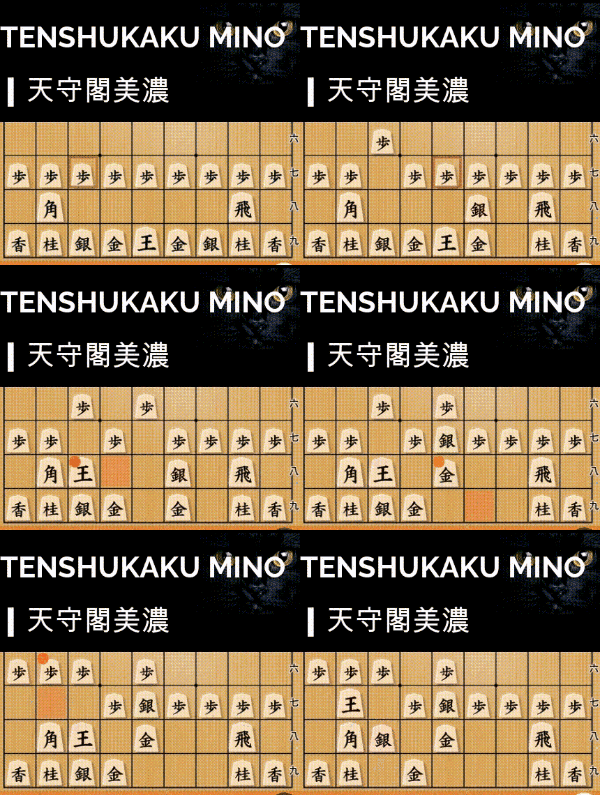
The Mino Castle is one of the most commonly used defensive structures by Ranging Rook players. In this article, we explore key techniques to break through its defenses, starting with side attacks.
Basic Technique: Breaking the One-Sided Mino
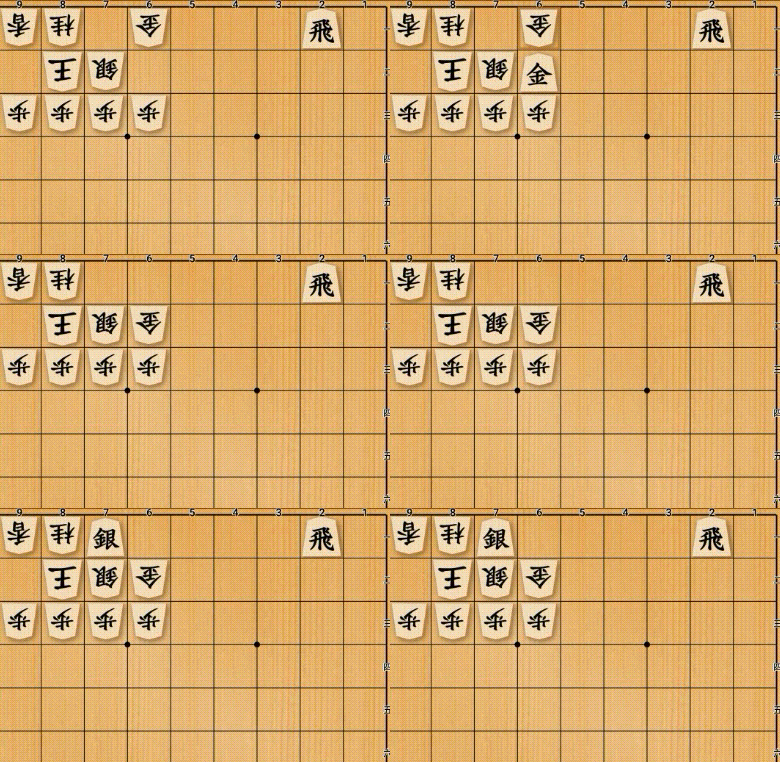
Let’s begin with the fundamental method for breaking the One-Sided Mino, a formation that is slightly weaker than the full Mino Castle, as it lacks one gold general. This structure appears frequently in actual games.
One of the key points in breaking the One-Sided Mino is to drop a rook onto the lowest rank. Mino-based formations are often vulnerable to attacks from the bottom, making it an effective strategy to position a rook on the last rank early on.
Gold Sacrifice to Open the Defense
A critical maneuver here is ▲G-62, sacrificing the gold. If the opponent ignores this, ▲G-61 follows, capturing their gold and weakening their defense.
If the opponent captures the gold with △Gx62, then ▲S-71 (a silver drop) creates a fork, attacking both the king and the remaining gold. You can also use a bishop in place of the silver, as long as you place a piece that exerts diagonal control.
The key idea is simple: first, drop a gold or silver on 62, and then place a silver or bishop on 71 in the third move.
Many Mino Castle players push their edge pawn early in the game to create an escape route for the king. This is because their structure is weak against attacks from the side and bottom.
Alternative Approach: Using a Lance
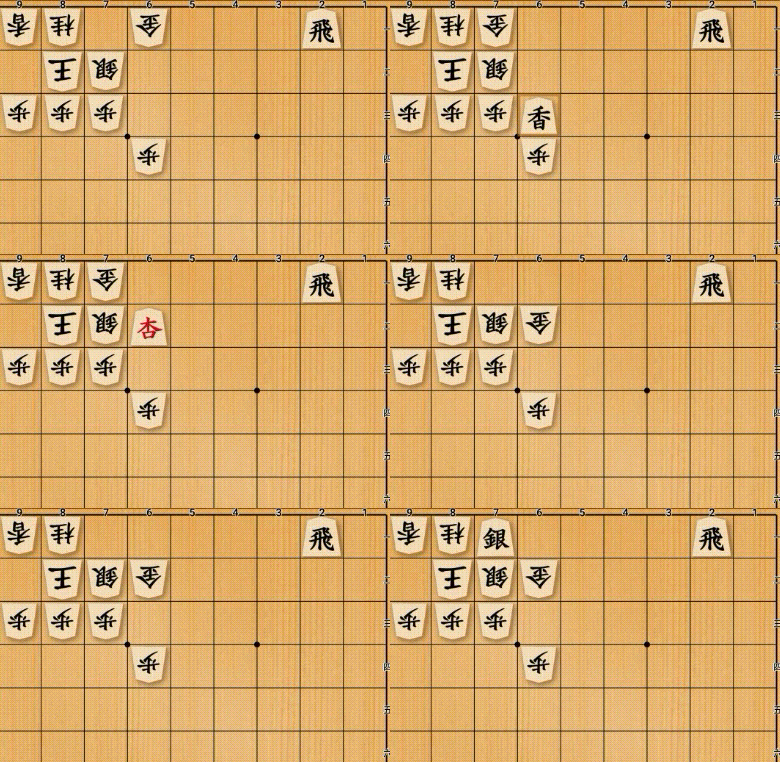
This pattern is similar to the previous one, but this time, instead of a gold, you have a lance in hand. Can you still execute a similar attack?
The key move is ▲L-63, dropping the lance from above. The next threat is obvious: ▲Lx61, capturing the opponent’s gold.
The defender will likely try to move the gold to safety, but then you can play ▲Lx62. If the opponent recaptures with △Gx62, then once again, ▲S-71 (or a bishop drop) will be devastating, breaking the Mino Castle’s structure completely.
As you can see, this pattern mirrors the previous one. These types of techniques form the foundation of breaking the Mino Castle!
Gradual Breakdown with a Promoted Pawn Attack
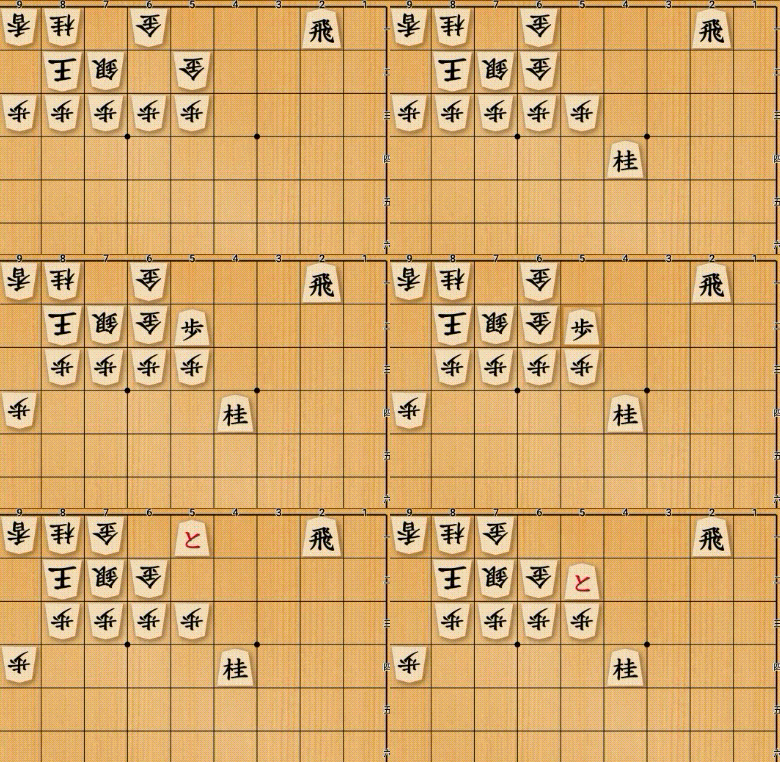
Now, let’s explore a technique to break the full Mino Castle, which has both gold generals in place.
This method uses only a knight and pawns, making it a practical and efficient attack in real games. While not flashy, it is highly effective.
A key principle when breaking the Mino Castle is to target the gold on 52. A simple way to do this is by attacking directly with a knight jump to 44. Once the gold moves, drop a pawn in its place.
Even if the defender moves the gold back with △G-51, you can still press forward with ▲P-52. This forces the opponent to react, and you can follow up with ▲Px51+, △G-71, ▲P-52+, steadily breaking through.
Using a promoted pawn to push against the opponent’s defensive gold is a fundamental technique applicable to breaking many types of castles.
Effective Use of the Bishop
1. Targeting the Gold Directly with the Bishop
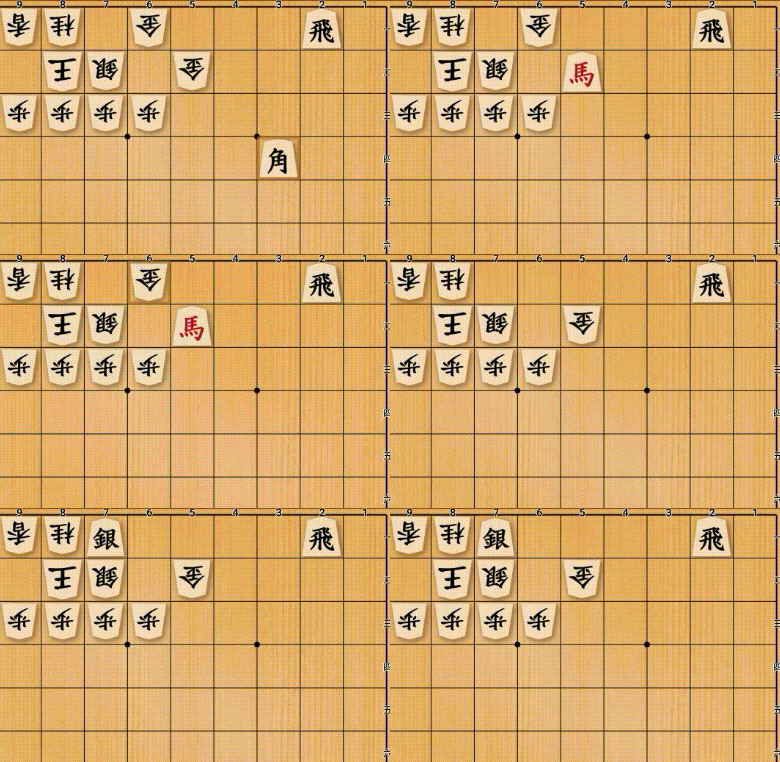
Now, let’s explore the impact of different bishop positions.
Imagine your bishop is placed on 34. The Mino Castle may seem stable at first glance, but there is a direct breakthrough.
A key technique here is sacrificing the bishop by promoting it immediately. In endgame situations, a promoted bishop is often less valuable than a well-placed gold, making this exchange favorable.If the opponent captures with △Gx, then ▲S-71 follows, leading to checkmate. This attack works even if the opponent has pushed their edge pawn, making it a versatile strategy.
2. Slipping Through the Gaps in the Mino Castle

Now, let’s consider the bishop positioned one square differently. How does this change the attack?
A powerful move here is dropping a silver on 71, where both the bishop and rook provide support. If the opponent captures with △Gx71, you can respond with ▲Rx71+, followed by ▲G-82, leading to checkmate.
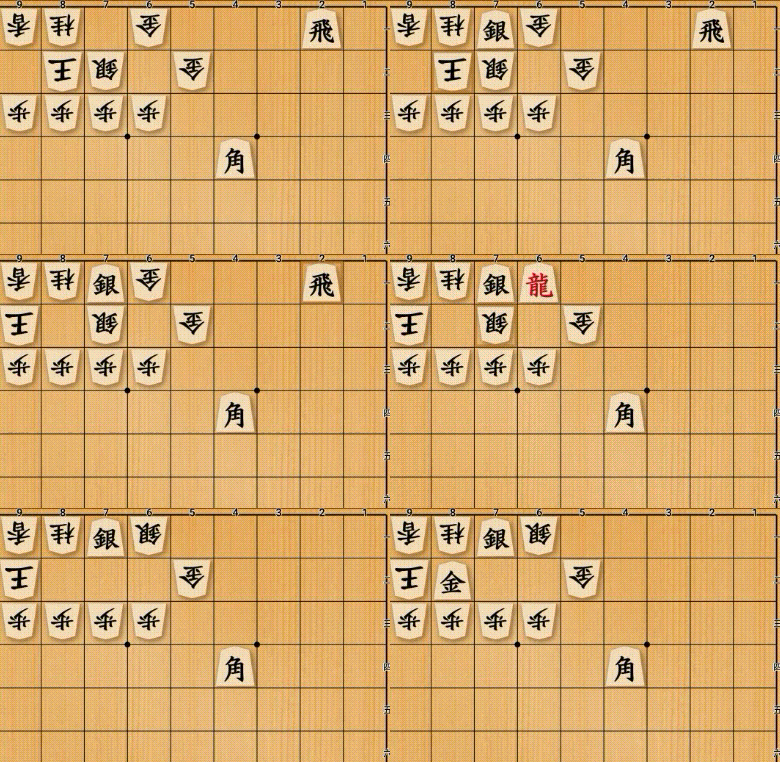
Since the opponent cannot afford to take the rook, they must try to escape, but you can continue attacking with ▲Rx61+. If the opponent attempts to block, your final move ▲G-82 will still force checkmate.
This sequence demonstrates how different bishop placements affect the strength of your attack.
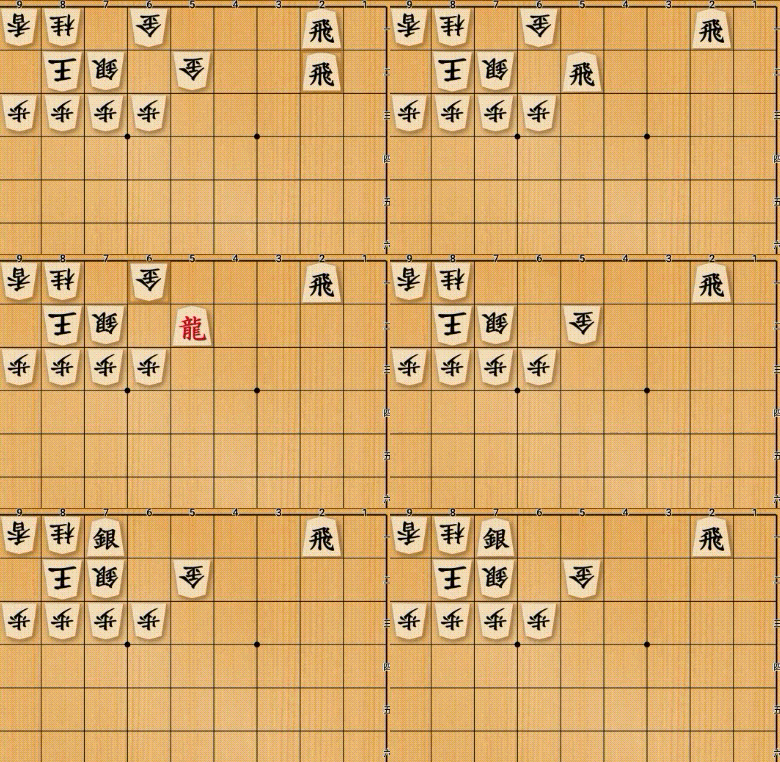
Crushing the Mino Castle with Two Rooks
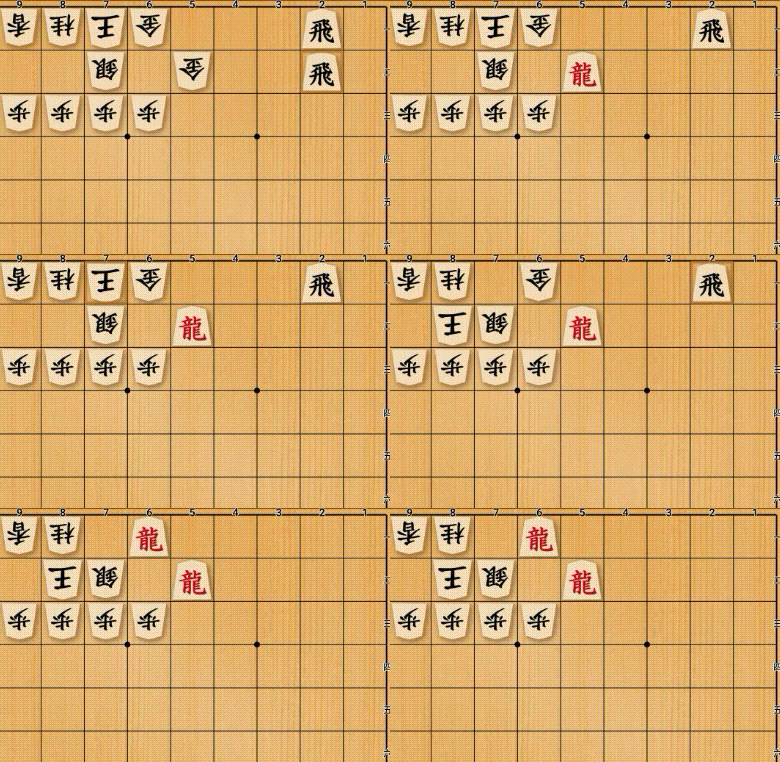
Finally, let’s examine a two-rook attack, a devastating strategy when you have a significant material advantage.
If you have two rooks in hand, which one should you use first?
The best approach is ▲Rx52+, sacrificing the first rook to capture the gold. If the opponent responds with △Gx52, the second rook remains a powerful threat.
If they try to escape with △K-82, you can continue the attack with ▲Rx71+, pressuring the king further. The opponent cannot easily capture the dragon, as doing so would allow a decisive checkmate sequence.
There’s a famous shogi proverb:
“Two rooks are scarier than a demon.”
Another says:
“A dragon one square away finds the mate.”
Executing a checkmate with two rooks is always satisfying!


